
Barrel Bushing
INFINITY TRI LOC II®BARREL BUSHING – INSTALLATION INSTRUCTIONS
Congratulations for purchasing the most technically advanced components in the world!
CAUTION: All persons in the room must always wear eye protection when disassembling or re-assembling a firearm. Even if you don’t plan on working on a portion of the firearm with a compressed spring, proper eyewear provides an extra margin of safety in the event you unintentionally release a compressed spring.
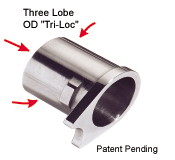
1. The outside diameter has three lobes that are equispaced for lockup.
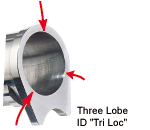
2. The inside diameter has three lobes that are equispaced for lockup and barrel control.
3. The SV Infinity Interchangeable Breechface slide has a very slight (.003 deep) relief on the inside of the muzzle end at the 9:00 o’clock and at the 3:00 o’clock positions. This allows the bushing to be “dropped” in with a “loose” fit of several thousands and then rotated (with a plastic wrench) for a “cam” lock interference fit. This system eliminates the tolerance stackup of conventional slides and bushings.
Infinity Tri-Loc II® Bushings are available in several different outside diameters.Fitting the outside diameter of the Infinity Tri-Loc II® to a slide other than an Infinity IBS will require polishing of the inside diameter of the slide (at minimum to remove burrs) and or mounting of the bushing to a mandrel and polishing the outside diameter with a narrow ribbon cloth (320 grit or finer) carefully to ensure that you have reduced the diameter between the locking lug and the face of the bushing the same as the area above the locking lug.
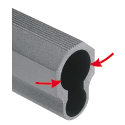
4. The Infinity Tri-Loc II® does not utilize a conventional narrow internal band that is only one thousands ( .001″) larger than the barrel diameter for barrel lockup. Rather, The Infinity Tri-Loc II® incorporates two cylinders – one parallel to the rails (unlocking position of the barrel) and the other that is parallel to the barrel during lockup (approximately .86 degrees).The barrel locks up just like a bull barrel in that it touches on the very muzzle end at the 4 and 8 o’clock positions and at the rear of the bushing (3/4″ from muzzle) at the 12 o’clock position. The design thus allows for approximately a .005 larger internal diameter than the barrel diameter for smooth operation and a vastly increased bearing seat area when locked up. Yes! , the design eliminates the ugly and damaging “bushing ring” on the outside diameter of the barrel.
The two lower internal lobes (4 and 6 o’clock) act as rails for the barrel to be guided on when the slide is moving thus reducing drag and also any possible binding from dirt etc.
5. Testing for proper muzzle lockup is very simple. Pull the slide slightly open and insert a one thousands (.001″) feeler gage about .100 ” wide at the 12 o’clock position and in about 1″ from the muzzle. Close the slide (barrel now in battery) and pull gently on the feeler gage. A slight resistance indicates a fit of less than .001. The slide may not fully close with the feeler gage in place. As you pull the feeler gage out the slide should close smoothly. If the slide does not close smoothly move to step 6 and repeat step 5 until you have achieved smooth operation.
6.Check for too tight a fit at the muzzle by testing the barrel bounce or spring back at the radial lugs. The 1911 system is capable of “bending” the barrel slightly. This is an elastic movement and the barrel will return to its “as manufactured” straightness with the bending moment removed.After checking for the lockup mark at the 12 o’clock position on the very rear of the bushing (lockup cylinder at .86 degrees) . Polish the mark lightly with a Dremel type sanding drum (400 grit or finer) and return to operation five (5) for retesting. Repeat operations five (5) and six (6) as required.
TESTING FOR AND CORRECTING BARREL BOUNCE IS A JOB FOR AN EXPERIENCED GUNSMITH ONLY.
The purpose of these instructions is not to educate an inexperienced person on the proper fitting of all aspects of barrel installation.