
Breechface
INFINITY INTERCHANGEABLE BREECHFACE® – INSTALLATION INSTRUCTIONS
Congratulations for purchasing the most technically advanced components in the world.
Caution:Eye protection is required for the operator and all persons in the room before proceeding.
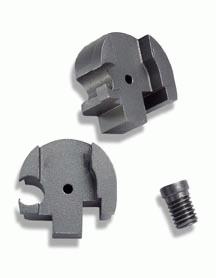
Two views of the breechface and the special screw which holds it in place.
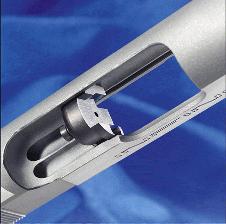
Cutaway view of a slide with the Interchangeable Breechface® in place.
Removal of the breechface from the slide requires the following simple steps:
- Make certain that the firearm is unloaded.
- Remove the slide from the frame.
- Remove the guide rod assembly from the slide. (Caution – the spring is compressed and the components are under pressure. Components have been known to travel great distances (up to 50 feet) if the spring is released inadvertently.)
- Remove the barrel by lowering the barrel link forward towards the muzzle end, and sliding the barrel out the muzzle end of the slide.
- With a small screwdriver or punch, depress the firing pin and slide the firing pin stop from the slide.
- Carefully release the firing pin (it is under light spring pressure) and remove it from the slide.
(Caution – the spring is compressed and the components are under pressure. Components have been Known to travel great distances (up to 50 feet) if the spring is released inadvertently.)
- Insert the long arm of a .125 Allen wrench into the firing pin hole and engage the breechface holding screw.
- Remove the screw by rotating it counterclockwise as viewed from the rear of the slide. (The threadlocker used may require a small amount of heat to loosen its hold on the screw. A blow dryer aimed at the junction of the disconnector rail and the breechface, heating the area to 400 deg. F will ease screw removal.)
- After turning the screw approximately six turns, push or tap the Allen wrench towards the muzzle to loosen the breechface.
- The breechface is now loose and will slide forward and can be removed through the ejection port cutout in the slide.
- If desired, you may now remove the Allen wrench and tap the rear of the slide lightly on a table and the breechface screw will fall from the firing pin hole.
INSTALLATION OF A NEW BREECHFACE FOR THE FIRST TIME MUST BE DONE BY AN EXPERIENCED GUNSMITH.
Replacement or installation of the interchangeable breechface:
- Clean the rear of the interchangeable breechface with a small brass brush.
- Clean the rear and side walls of the breechface tunnel with a small brass brush.
- Proper seating of the interchangeable breechface requires a very clean, deposit free fit.
- Inspect the threads of the breechface screw for scarring or marking. If the threads are damaged, replace the screw now with a factory original part only! (The screw has a 10-32 thread and is manufactured to factory specifications)
- Inspect the threads in the rear of the interchangeable breechface. If the threads are damaged, replace the breechface now! ( The thread is 10-32)
- Inspect the breechface for wear. If you see any unusual wear, replace the breechface now!
- Insert the breechface screw into the rear of the firing pin hole while holding the rear of the slide upright.
- Insert the .125 Allen wrench into the firing pin hole and push the breechface screw forward until it stops. There should be approximately four or five threads showing in the breechface tunnel.
- Apply a small amount of removable threadlocker to the exposed threads. Be sure to avoid any migration of the threadlocker into the firing pin hole.
- Rotate the slide horizontal while maintaining pressure on the Allen wrench to hold the screw in place.
- Insert the breechface through the ejection port – continue to maintain pressure on the Allen wrench. A light tap of a brass punch inserted from the muzzle end of the slide may be required to seat the breechface.
- Be sure to check the rotation of the breechface such that the disconnector rail in the slide and on the interchangeable breechface are aligned.
- The interchangeable breechface is precisely located by the internal geometry of the slide and the outside profile of the interchangeable breechface.
- While holding the interchangeable breechface firmly against the tip of the screw, begin turning the Allen wrench clockwise (as viewed from the rear of the slide).
- The breechface will seat into the breechface tunnel with light screw pressure. Do not force the breechface into place!
- If the screw requires more than light pressure “STOP”! Return to step one and begin the procedure again.
- Torque the screw to 18-20 inch pounds with a properly calibrated torque wrench.
- Clean the underneath of the breechface and slide with a soft cloth
- Inspect the alignment of the breechface portion of the disconnector rail and the slide disconnector rail. The fit should match within .001″ to allow proper function of the disconnector.
- If installing a new breechface for the first time, some light stoning of the disconnector rail surface to achieve a match may be required. Subsequent removal and reinstallation will repeat within .001″.
- The firing pin channel on an Infinity slide with Interchangeable Breechface is shorter than a standard 1911. The firing pin length is standard, however, the firing pin spring must be cut to a length where the end of the spring is flush with the tip of the firing pin when the spring is fully seated on the firing pin.