
Optifit Fitting
INFINITY OPTIFIT® – THUMB SAFETY GUNSMITH FITTING * INSTALLATION INSTRUCTIONS
Congratulations for purchasing the most technically advanced components in the world!
CAUTION: All persons in the room must always wear eye protection when disassembling or re-assembling a firearm. Even if you don’t plan on working on a portion of the firearm with a compressed spring, proper eyewear provides an extra margin of safety in the event you unintentionally release a compressed spring.
INSTALLATION OF A NEW OPTIFIT® THUMB SAFETY MUST BE DONE BY AN EXPERIENCED GUNSMITH!
Gunsmith Installation of the OptiFit® Thumb Safety:
- Make certain that the firearm is unloaded.
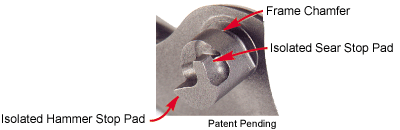
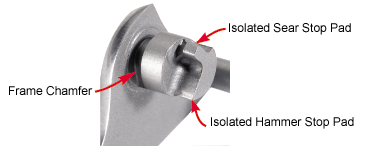
- The fitting lug has two isolated lobes.
-
- The first restricts upward motion of the safety with the hammer down (hammer stop pad).
- The second restricts movement of the sear with the hammer fully cocked (sear stop pad).
- The inside of the fitting lug is chamfered to allow smooth operation in the frame slot.
- With the hammer fully cocked, grip the left side safety serrations and insert the .154″ dia. pin into the frame hole. Installation of the grip safety is not necessary at this time.
- Line up the boss on the rear of the safety with the top of the “cloverleaf” hole in the frame and insert (up or safety on position).
- Rotate the left side safety fully counterclockwise (down or off position)
- Release the hammer gently and until it rests against the firing pin stop. Test the upward movement of the safety. The safety lock pad should be restricted from rising into the slide lock notch.
- If the hammer fails to contact the firing pin stop and the safety has no upward movement then the hammer stop pad will need to be shortened slightly.
- Reverse the previous operations and remove the safety. Using a #2 or finer Swiss type file that is has no cutting teeth on the edges (sides) remove several thousands of material from the hammer stop pad and repeat steps there (3) though seven (7) until properly fit. Be sure to remove material parallel to the existing surface.
- Once the hammer stop pad has been fit install the safety in the frame (operations three (3) though (5) ).
- Rotate the safety upward (clockwise). If the safety rotates freely through its full travel move to Operation 10 and begin safety checks.
- If the safety is restricted from full upward motion then fitting of the sear stop pad is required.
- Using a #2 or finer Swiss type file that is has no cutting teeth on the edges (sides) remove a few thousandths of material from the sear stop pad and repeat the previous steps. Be sure to remove material parallel to the existing surface
- Perform all safety tests.